Saturday, June 11, 2011

Beaded Princess Crown

Some of you may remember that last year, I made Nancy-Raven a crown for her birthday after she expressed the desire to wear one on her special day, as she would be "The Queen of the day". About a week before my own birthday, I was hit with the sudden desire to do the same, because lets face it, it is a great idea.

My inspiration came from this lovely princess crown:

Beaded Wrap-Wire Crown

I found it on Etsy a year ago, but I cannot remember from which seller if any one knows, please let me know so I can add their information here – everyone deserves credit for their work). There is something in this look that I find reminiscent of Odette, The Swan Princess.

So, the night before, around 10 PM (this is me we're talking about), I set myself to the task of making my own crown while watching My Big Fat Gypsy Wedding on
TLC. Nothing like ridiculously poofy dresses and humongous crowns on 18 year old brides to get you inspired! By 1 am, I was done.

Blue Beaded Princess Crown

Not as pretty, but it is only my second attempt at making a crown, and honestly, I'm happy with it. Of course, you will be shocked I am sure that I made mine silver and blue, with turquoise and lilac accents. No one could have predicted that I would go for aquatic colours, right? But you see, it was to match the new summer dress I made myself (and finished at 1:15 PM the day of).

Happy Birthday Gwenyver!
(Don't even try, I'm not telling you my age. That is for me to know and you to guess!)

Of course, it turned out to be a wet and chilly evening, so I had to wear leggings under my new sun dress – because there was no way I was going to change my outfit due to Mother Nature’s whims; I had worked too hard for that!

By the way, the dress is made with pattern
Simplicity 4531. It is the third dress I have made using that pattern and I really like all of them. There is a little something ‘50s about them in my opinion.

You know what else is great about that crown? It would be perfect for a Snow Queen or Ice Fairy costume!

New Victorian Patterns

Recently, it was my birthday. And amongst my many gifts, Nancy-Raven, who knows me so well, gave me my first Truly Victorian patterns. Let me tell you, I clapped my hands with excitement like a cartoon character as I unwrapped them.

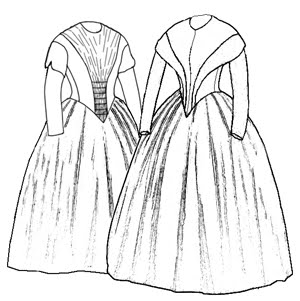
First, a little something with a full round skirt.

As Nancy-Raven put it, this looks like it would elongate the body, which is always good when you are round. I believe this would be a great dress to make and wear at Les fêtes victoriennes in Victoriaville, QC, if I ever get go that is.

Now I wonder what type of fabric and print I should look for to make this dress. Research ahead! Actually, I have begun looking around on the Net for ideas for a German Day Dress (and general 1840's Day Dresses) and found a lovely post about 1845 German Day Dresses with many pictures on Dressing the 1840s.

Second came a pattern I have wanted for years.

1873 Polonaise - TV410

You see, I have long been in love with Trystan's Sushi Victorian Dress, and although hers was made using a different pattern (Past Patterns' 1880s Polonaise With Walking Skirt), it is still a Victorian Polonaise. Besides, I like the sleeves on the Truly Victorian pattern better.

Somehow, even with the Red Sushi Dress as the origin for my desire for a Victorian Polonaise, my first idea upon receiving this pattern was to make a mourning version. I just think it would look great in a black tonal jacquard or brocade, don't you?

As I said, I was really pleased and happy with these gifts, but I think my Sweetheart's comment said it best; he said with these patterns, Steampunk for me is definitely here to stay!

Thursday, June 9, 2011

Red & Gold 18th Century Outfit

Somewhere in my stash (in an organized and labeled bin where I can fairly easily find it) I have some some red and gold silk shantung. It was a present from my Mom, back when I was working on the costumes for "Le Tzigane au Croissant d'or". She thought I might like to make myself an English dress in the 1750's style I kept making for the play's Noble ladies, so for my birthday, she bought me silk. She remembered me saying I needed about 6 metres of material for one dress, so what she got me was 3 metres in each colour.

Unfortunately, I need 6 metres for the over dress and 3 metres for the skirt, so I can't make a full length dress, but I could make a short dress or Caraco with one colour and the skirt with the other.

But I can't make up my mind as to which colour should be used for what garment. What do you think?

Red Caraco & Gold Skirt Concept Art

Gold Caraco & Red Skirt Concept Art

Which combination should I make? I will let you, my faithful readers, vote on the matter and I will abide by the majority's choice.

Friday, May 27, 2011

Asian Steampunk Costume Concept

Have you ever had a simple project take unprecedented proportions?
Back before the Yule season, as I was planning what I would wear for each party, I had intended to make myself a corset using leftover Chinese Brocade from my
Arwen Dying Gown. I loved the corset I made for Halloween using pattern Simplicity 2966 and want to make many more. I had bought a black skirt on sale at Sears the fall before and its shape made me think of Flamenco dances somehow, so I wanted something red to wear with it and the corset seemed a perfect idea. But then, I would need a shirt. “How about using Threadbanger’s Steampunk shirt tutorial?” I told myself. I could go to some second hand store and find an old man’s shirt to cut up, right? Do you see where this is going?

One thing let to another and I imagined an entire Steampunk outfit from that one corset project. Of course, I never did make any of it in time for New Year (and still have not started working on it), but I did have the entire look planed down to the hairstyle by the time I went back to work. And now five months later, I have finally kicked myself into sketching it. Here it is:

Asian Steampunk Concept - Front

Asian Steampunk Concept - Back

Let me explain what you are seeing here. This outfit consists on the red Chinese brocade corset, trimmed with black satin ribbon and laced down the back; a white linen shirt with mandarin collar, the whole edged with black sating stitching and closed on angle with black frog closures; a bolero length black velvet vest with high neck in the back and sweetheart neckline, antique brass frog closure below the bust and Furisode sleeves; a floor length black jacquard skirt with train and a slit up the left thigh kept shut by leather closures and antique brass buckles; a red taffeta bustle and a highly embroidered gold trimmed panel at front (inspired by the bustle pictured below). A chain on the right wearer’s side will hold a skeleton key, gear and a Chinese coin. Since my legs will me showing, I thought I would wear fishnet tights with my Victorian inspired boots.

The inspiration for the bustle and front panel - Steamflower Bustle by Laohats

My hair would be done in a Gibson Braid-Tuck, an Edwardian hairdo of three braids pinned and tucked. I have used this hairstyle often and love it. I might add a couple of hair sticks to it (not drawn).

Gibson Braid-Tuck by That Costume Girl

Finally, a traditional Chinese hat will cover my head. I have wanted one for awhile now, especially after my friend C.B. visited two years ago and lent me one for a photo.

Gwenyver and C.B., Summer 2009

My (current) goal is to have it done for Montréal ComicCon, but I have to work on Princess Peach first.

So who is up for a shopping trip in china town? I need to find myself a hat and some dangles for decoration.

Saturday, May 21, 2011

Lady Gaga "Judas" Music Video

Have I ever told you that I am a Lady Gaga fan? Oh, that often, heh? Well...

Lady Gaga's new video Judas requires mentioning because the costumes she wears in it are many, amazing, and come from various sources of inspiration. Here are my Top 5 favourites.

Number 5: The Wave Dress

Lady Gaga, "Judas" music video, 2011

In this case, it is hard to see the details, but I liked that it was long and metallic. I also always love water scenes. Hopefully one day, I will know more about it.

Number 4: The Killer Nails

Lady Gaga, "Judas" music video, 2011

I simply love burgundy and deep green together. I used to paint my nails in this fashion as a teen; maybe the fashion will finally kick in now! Plus I love all the bling on those claws (except maybe for the moss).

The shirt has a somewhat Victorian and romantic feel to it, from what we can see of it, i.e. the cuffs. And is it just me, or is that eye make up inspired by an Oudjat (slightly inverted)?

Number 3: The Doublet

Lady Gaga, "Judas" music video, 2011

Here we have a lovely embroidered doublet, straight out of The Tudors. I have a velvet doublet that I wear as a jacket; perhaps I will no longer be alone after this.

As for the hairstyle, I have read some comments comparing it to Snookie's , but my first thought was in fact Centauri males (in Babylon 5).

Number 2: Riding Look

Lady Gaga, "Judas" music video, 2011

Not only do i like red and purple together, but lets be honest: what girl does not love a Tiara? That bejeweled cold crown is gorgeous.

Really, I just thought Miss Gaga looked stunningly beautiful in this scene.

Number 1: The Egyptian Bride

Lady GaGa, "Judas" music video, 2011

This is my favourite look of all, and we only see it for a few seconds at the end of the video. The wig looks like something Egyptian, the dress is a mixture of Lolita and 80's wedding dress and the shoes seem to be 50's saddle oxford. It almost feels like I have seen this look before in a manga, but can't exactly put my finger on which one. In any case, someone had better market that wig because I want it. In fact, I think I may have found my Halloween costume.

If you haven't seen the video yet, here is you chance:

Tuesday, May 17, 2011

The Princess Peach Project: Research

It is official: we (my daughter and I) are going to Otakuthon this year. I have paid for our registration, so unless one of us is too sick to go, WE ARE GOING.

Which means I have to start working on our costumes, and as we all know, research is the best part of planning. I had already decided back in February (see
Otakuthon 2011 Costume Project: Princess Peach and Toadette, posted on February 5, 2011) that we would go as Princess Peach Toadstool and Toadette.

Toadette from Super Mario

Toadette should be fairly easy to make: a summer dress, a vest, some white shorts and slip cover for my daughter’s bicycle helmet should do the trick. Since Otakuthon is the week-end of August 12 to 14, and toddlers tend to grow really fast, I will wait until July to start making her costume.

Princess Peach on the other hand poses a challenge. First, there are many designs to choose from.


Princess Peach as she appears on Super Mario Bros 3

Princess Peach in her appearance for New Super Mario Bros Wii

Princess Peach in her appearance for Super Smash Bros

I am leaning towards the second one. Simple, but slightly more detailed than the first one, and I really like the resemblance of the skirt to Disney’s Cinderella’s.

Disney’s Cinderella

The real challenge is to make it right. It looks simple, but looks can be deceiving. I have looked all over for pictures of Princess Peach cosplay that I liked, but in general, the fabric is too shiny, the proportions are wrong, or the fit just isn't right. I was beginning to believe that this was the costume that never looked good. It was suggested to me that I should see this as a challenge, to make a good looking one, but honestly, I was getting really afraid, thinking “What am I getting myself into?”.

But then I found two.

The first one is made according to design number one.

Jenni Källberg, aka Pixelninja, as Princess Peach

It fits well, the skirt has the right volume, and I really like the way the darker bottom colour in the sketch was interpreted as an underskirt. It makes the whole look like a real dress for a real person, not just a pink costume.

The second one is made to be like the more detailed concept art.

Princess Peach by Enayla

Again, beautiful fit and proportions. I have not seen the panniers look so good on any other cosplay of this character. The sleeves are also perfect puff sleeves, and the collar is just the right height. I will look at this picture often when making my own as a reference for these details.

I am now feeling a little better about the project. I now believe that a good looking Princess Peach costume, in the version I want to make, can, in fact, be achieved.

But since I am not as slim as the girls in the above picture, maybe I’ll invest in a good pair of Spanx. It can always be useful!

Monday, May 16, 2011

Mondrian Kimono Project

span style="font-family:verdana;">I have had a crazy Kimono idea. It all started with an innocent discussion on the Immortal Geisha forum about fabrics we would love to use to make Yukata. One person there suggested printing a Monet painting on a silk Kimono, and suddenly it hit me: A Mondrian Kimono.

For those of you who do not know Piet Mondrian (1872-1944), he was an artist who became famous for his abstract paintings of grids with blocks of bold colours, generally primary colours (red, yellow and blue).

Composition with with Red, Blue and Yellow, P. Mondrian, 1930, oil of canvas

Of course, fashion aficionados will remember that Yves Saint-Laurent made a very famous shift dress inspired by Mondrian’s paintings.

Yves Saint Laurent, "Mondrian" Day dress, Autumn 1965 (Wool jersey in color blocks of white, red, blue, black, and yellow)

Since Kimono are so geometric (square) in construction, you can see how Mondrian’s art would fit the shape perfectly.

Once inspiration struck me, I began playing with shapes and colour to come up with this concept for my Kimono:

Mondrian Kimono Concept by Gwenyver

I tried to keep everything balanced, while placing the colour blocks in places where a Kimono would usually get more detailed decoration. I may re-work the design before actually making it, but for now, it gives you a good idea of my concept. Of course, I would wear it with a Ro Obi, but I am unsure what colour it should be. So many possibilities!

Now, should I make it by painting the cloth, like Mondrian, or should I use blocks of fabrics, somewhat like a quilt, the way Yves Saint-Laurent did?