Thursday, July 21, 2011

Princess Rosalina's Accessories

Right after I posted about my change of heart for my Otakuthon costume the other night, I began to search for hints at how I could make Rosalina's crown look good. I had seen some nice ones, but I don’t know how to cast plastic and I am not teaching it to myself in the next three weeks. Finally, I found this tutorial by Martyn which uses my material of choice, Fun Foam.

Peach, Daisy, Rosalina Crown Tutorial by Martyn

I read through the list of material needed, and the only things I don’t have on hand are a brain which remembers how to do math using π (working on that with my sweetheart, it’ll come back to me if I don’t try to work at it when I'm short on time or super tired), and the plastic cabochons to use as gems for the crown.

I looked into buying the same 35 mm cabochons from
PlasticBeadsWholesale.com that Martyn used, but they only come in dozens (8.50$ for 12 - I need 2 colours), and if you buy for less than 30$, you get an up charge of 20$ for not meeting the minimum price. Plus, since I live in Canada, shipping will not be Free as advertised (it never is). Al in all, It will probably cost me about 40$ so I can get 4 plastic cabochons. Not really worth it for me.

Instead, I found these 30 mm Crystal Stickers in the Scrapbooking section of my local Omer DeSerres – for 2.95$ +tx.

30 mm Crystal Stickers

To give them the proper colour, I will use some faux stained glass paint. I’ll either buy the two colours I need, or ask my favourite aunt to let me use hers since this is her current hobby.

Martyn (my hero) also shared a tutorial on making the rest of Rosalina’s accessories, because this princess not only wears a crown, she has a wand, a brooch and huge earrings.

Rosalina Accessories Tutorial by Martyn

The wand used fun foam and a wooden dowel. Check! The brooch requires more fun foam and some sort of plastic dome. I will be looking very closely at those vending machines which sell cheap toys in plastic spheres. For the earrings, yet more fun foam and some jewellery findings. Check again!

I can’t go fabric shopping until next week, but at least, I can get started on my accessories this week.

Tuesday, July 19, 2011

Same event, different princess

Otakuthon is less than 4 weeks away and I have not yet begun making our costumes. “What in Hel’s name am I waiting for?” I hear you think. Well first, I've been getting a lot of commission requests (Thank you everyone), which keep me busy. But the main reason is, I’m getting cold feet… about my choice of costume.

(Warning: boring self issues stuff ahead)

Let’s face the facts: I have body image issues (what woman does not) and since it is always best to dress for your body type even when in costume, I fear my original choice might be wrong for me. Let me explain: in my experience, I look better when I have skin showing around my face – turtle necks make me look fatter – and the Princess Peach dress has a high collar. Also, I inherited my great grandmother’s biceps, and believe me, I could have done without. Wearing short puffy sleeves and long white gloves will only serve to enhance this feature which I spend my life hiding (really, I wear ¾ sleeves in the summer when it’s 35° with Humidex). The more I think about it, the more I fear I will look like a big pink blob (Nancy-Raven says I’ll look like a dragée – sweet, but not that helpful). I am at the point now where I would rather skip Otakuthon than make that big, poofy, pink dress. Costuming should be fun, so why am I torturing myself?

(Okay, I’m done complaining now!)

I considered going back to other ideas I had had for Otakuthon, but I really want to make that Toadette costume for my daughter. Then I remembered someone mention another Super Mario Princess:

Rosalina in her appearance for Super Mario Galaxy

Strawberry blond, turquoise dress, silver accessories… Now that is what I’m taking about! It is perfect for me! The dress has an empire waist, perfect for hiding, hmm, flaws, and long, off-the-shoulder bell sleeves. I love it! An off the shoulder dress is actually what I had made for my Prom. See?

Gwenyver, High School Prom, June 23, 1999

(I swear that plain satin dresses were in fashion - just go and re-watch Buffy!)

Plus, I can get away with wearing just a flounced petticoat, and not a full crinoline under it, which will be practical with a toddler.

I think I’ll use patterns Simplicity 9125 and Butterick 4301 (used for the above pictures Prom dress) as blocks to make Rosalina's dress.

Simplicity 9125

Butterick 4301

Okay, now let’s get fabric hunting, cutting, sewing, and accessory making. Only 25 days left!

Sunday, June 12, 2011

My new Steampunk Bracelet

Nancy-Raven really spoiled me for my birthday, as she often does. Along with the two Truly Victorian Pattern previously mentioned, she gave a 20$ voucher for Fabricville (always a winner with me), and the pièce de résistance, this amazing Steampunk bracelet from La Table Ronde:

Steampunk Bracelet by Florica, on black velvet bag

Not that I ever speak of Steampunk, really. That I have been drooling over that collection for about a year now, especially the tiara might I add (but is friggin expensive), and that I wear bracelets a lot might also have influenced her choice. I love it, I love it, I love it, I love it, I love it! I want to wear it everyday.

Steampunk Bracelet by Florica, detailed view

I do have to make myself a Steampunk outfit. Soon!

Saturday, June 11, 2011

Beaded Princess Crown

Some of you may remember that last year, I made Nancy-Raven a crown for her birthday after she expressed the desire to wear one on her special day, as she would be "The Queen of the day". About a week before my own birthday, I was hit with the sudden desire to do the same, because lets face it, it is a great idea.

My inspiration came from this lovely princess crown:

Beaded Wrap-Wire Crown

I found it on Etsy a year ago, but I cannot remember from which seller if any one knows, please let me know so I can add their information here – everyone deserves credit for their work). There is something in this look that I find reminiscent of Odette, The Swan Princess.

So, the night before, around 10 PM (this is me we're talking about), I set myself to the task of making my own crown while watching My Big Fat Gypsy Wedding on
TLC. Nothing like ridiculously poofy dresses and humongous crowns on 18 year old brides to get you inspired! By 1 am, I was done.

Blue Beaded Princess Crown

Not as pretty, but it is only my second attempt at making a crown, and honestly, I'm happy with it. Of course, you will be shocked I am sure that I made mine silver and blue, with turquoise and lilac accents. No one could have predicted that I would go for aquatic colours, right? But you see, it was to match the new summer dress I made myself (and finished at 1:15 PM the day of).

Happy Birthday Gwenyver!
(Don't even try, I'm not telling you my age. That is for me to know and you to guess!)

Of course, it turned out to be a wet and chilly evening, so I had to wear leggings under my new sun dress – because there was no way I was going to change my outfit due to Mother Nature’s whims; I had worked too hard for that!

By the way, the dress is made with pattern
Simplicity 4531. It is the third dress I have made using that pattern and I really like all of them. There is a little something ‘50s about them in my opinion.

You know what else is great about that crown? It would be perfect for a Snow Queen or Ice Fairy costume!

New Victorian Patterns

Recently, it was my birthday. And amongst my many gifts, Nancy-Raven, who knows me so well, gave me my first Truly Victorian patterns. Let me tell you, I clapped my hands with excitement like a cartoon character as I unwrapped them.

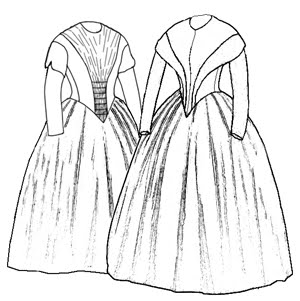
First, a little something with a full round skirt.

As Nancy-Raven put it, this looks like it would elongate the body, which is always good when you are round. I believe this would be a great dress to make and wear at Les fêtes victoriennes in Victoriaville, QC, if I ever get go that is.

Now I wonder what type of fabric and print I should look for to make this dress. Research ahead! Actually, I have begun looking around on the Net for ideas for a German Day Dress (and general 1840's Day Dresses) and found a lovely post about 1845 German Day Dresses with many pictures on Dressing the 1840s.

Second came a pattern I have wanted for years.

1873 Polonaise - TV410

You see, I have long been in love with Trystan's Sushi Victorian Dress, and although hers was made using a different pattern (Past Patterns' 1880s Polonaise With Walking Skirt), it is still a Victorian Polonaise. Besides, I like the sleeves on the Truly Victorian pattern better.

Somehow, even with the Red Sushi Dress as the origin for my desire for a Victorian Polonaise, my first idea upon receiving this pattern was to make a mourning version. I just think it would look great in a black tonal jacquard or brocade, don't you?

As I said, I was really pleased and happy with these gifts, but I think my Sweetheart's comment said it best; he said with these patterns, Steampunk for me is definitely here to stay!

Thursday, June 9, 2011

Red & Gold 18th Century Outfit

Somewhere in my stash (in an organized and labeled bin where I can fairly easily find it) I have some some red and gold silk shantung. It was a present from my Mom, back when I was working on the costumes for "Le Tzigane au Croissant d'or". She thought I might like to make myself an English dress in the 1750's style I kept making for the play's Noble ladies, so for my birthday, she bought me silk. She remembered me saying I needed about 6 metres of material for one dress, so what she got me was 3 metres in each colour.

Unfortunately, I need 6 metres for the over dress and 3 metres for the skirt, so I can't make a full length dress, but I could make a short dress or Caraco with one colour and the skirt with the other.

But I can't make up my mind as to which colour should be used for what garment. What do you think?

Red Caraco & Gold Skirt Concept Art

Gold Caraco & Red Skirt Concept Art

Which combination should I make? I will let you, my faithful readers, vote on the matter and I will abide by the majority's choice.

Friday, May 27, 2011

Asian Steampunk Costume Concept

Have you ever had a simple project take unprecedented proportions?
Back before the Yule season, as I was planning what I would wear for each party, I had intended to make myself a corset using leftover Chinese Brocade from my
Arwen Dying Gown. I loved the corset I made for Halloween using pattern Simplicity 2966 and want to make many more. I had bought a black skirt on sale at Sears the fall before and its shape made me think of Flamenco dances somehow, so I wanted something red to wear with it and the corset seemed a perfect idea. But then, I would need a shirt. “How about using Threadbanger’s Steampunk shirt tutorial?” I told myself. I could go to some second hand store and find an old man’s shirt to cut up, right? Do you see where this is going?

One thing let to another and I imagined an entire Steampunk outfit from that one corset project. Of course, I never did make any of it in time for New Year (and still have not started working on it), but I did have the entire look planed down to the hairstyle by the time I went back to work. And now five months later, I have finally kicked myself into sketching it. Here it is:

Asian Steampunk Concept - Front

Asian Steampunk Concept - Back

Let me explain what you are seeing here. This outfit consists on the red Chinese brocade corset, trimmed with black satin ribbon and laced down the back; a white linen shirt with mandarin collar, the whole edged with black sating stitching and closed on angle with black frog closures; a bolero length black velvet vest with high neck in the back and sweetheart neckline, antique brass frog closure below the bust and Furisode sleeves; a floor length black jacquard skirt with train and a slit up the left thigh kept shut by leather closures and antique brass buckles; a red taffeta bustle and a highly embroidered gold trimmed panel at front (inspired by the bustle pictured below). A chain on the right wearer’s side will hold a skeleton key, gear and a Chinese coin. Since my legs will me showing, I thought I would wear fishnet tights with my Victorian inspired boots.

The inspiration for the bustle and front panel - Steamflower Bustle by Laohats

My hair would be done in a Gibson Braid-Tuck, an Edwardian hairdo of three braids pinned and tucked. I have used this hairstyle often and love it. I might add a couple of hair sticks to it (not drawn).

Gibson Braid-Tuck by That Costume Girl

Finally, a traditional Chinese hat will cover my head. I have wanted one for awhile now, especially after my friend C.B. visited two years ago and lent me one for a photo.

Gwenyver and C.B., Summer 2009

My (current) goal is to have it done for Montréal ComicCon, but I have to work on Princess Peach first.

So who is up for a shopping trip in china town? I need to find myself a hat and some dangles for decoration.