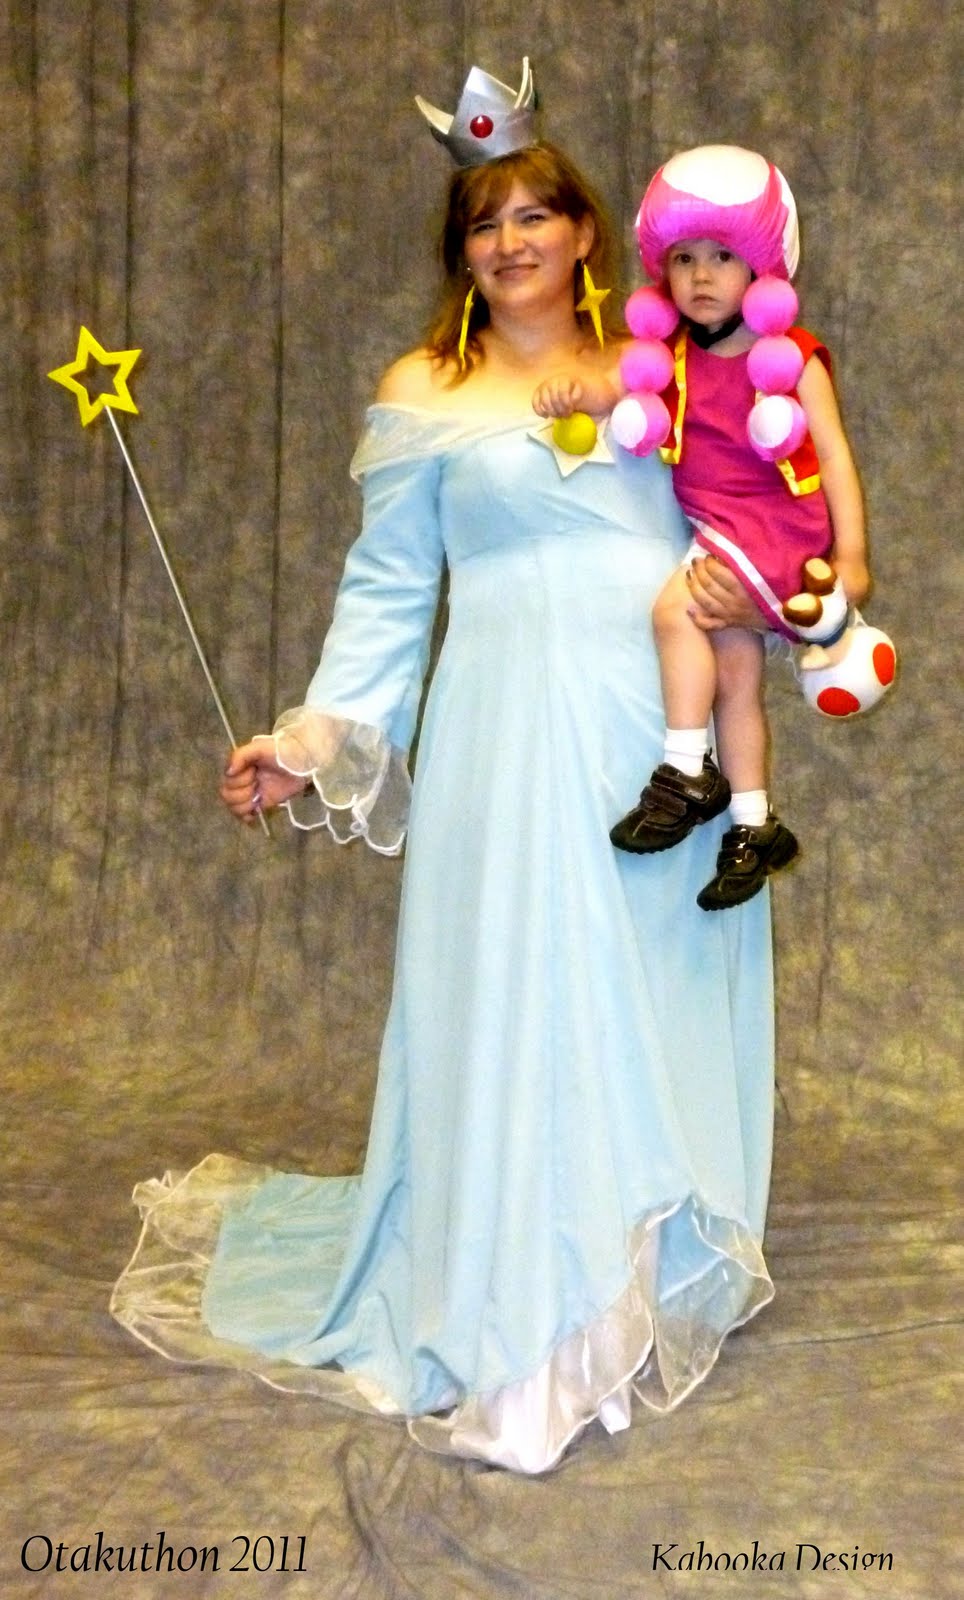
For Otakuthon, the costume I worked the hardest on was Rosalina. Although not as popular as Toadette (I never stood a chance next to so much cuteness), I worked very hard on it and I am proud of what I achieved.
 Gwenyver and Daughter as Rosalina and Toadette, photo by Tommy
As you all know, this was a last minute decision, but one I am happy with. I never felt self conscious wearing my dress (I would actually go so far as to say I felt sexy, except for the excited toddler I was running after while pushing a fully loaded stroller and trying not to trip over your train), and I don’t hate every picture of me out there (but some yes – the quick-snaps-where-your-face-is-contorted-weirdly ones, mostly). So here is my Rosalina costume in details.
The Dress
 Rosalina Dress
Obviously, this is almost all of the costume. This dress is actually in three layers: the dress itself, a foundation, and an underskirt.
 Rosalina Dress Fabrics
For the dress, I used polyester crepe which I found on sale (of course). I knew it was going to be hot (and it was), but it had the perfect matte but shiny look I was going for without using satin. I used pattern Butterick 4301 as a basic bloc and made a new pattern with a separate empire waist bodice, shaped skirt with train and long bell sleeves.
 Rosalina's Dress - Sleeves' Flounces
The flounces at sleeves and bottom hem I interpreted as being made of sheer organza. In the case of the sleeves’ flounces, they had to have a shaped border, so I used the same technique here that I had used for my Padmé Picnic gown (a long, long time ago, in an apartment far away): I drew my shape on some tearaway, in this case using a frozen juice can top, then I pinned the organza to the tearaway and satin stitched following the curvy lines. The flounce at the bottom hem is curved to nothing at center front and finished with an overlock machine, and then turned and sewn. All the flounces were ruffled using a ruffler foot before being attached to their respective parts.
 Rosalina's Dress - Neckline
The shawl collar is also made of organza, but in this case I used two layers that I shaped to curve to nothing at center front, sewed and overlocked together at the bottom edge. I flipped the piece over so the overlocked edge would be inside and I pressed that seam flat. The open side was sewn to the dress, sandwiched between the self fabric and the foundation or lining.
The sleeves are lined with cotton poplin for a cleaner finish and a more comfortable wear.
Because Rosalina is the mother of all lumens (which are stars), I used the star shaped decorative stitch on my machine and silver thread to decorate the bottom hem, the sleeves’ hem and the collar, eve thought it would not bee seen. This stitch not only kept everything in place and lying flat, I also thought it was the perfect little touch that matched the character’s personality. This I did on Friday night (of the between 10:30 PM and 12:00 AM. What can I say, I’m a perfectionist!
The foundation is a corset like piece made of leftover white spandex from Toadette’s helmet, and tie wraps as boning. If you are ever looking for cheap boning for a costume you will not wear that often, tie wraps are the best – inexpensive, easy to find, easy to cut, and very comfortable. (For everyday wear, invest in proper boning.) Because the fabric I used for this layer was so stretchy, I made the foundation a little smaller than I would normally make a corset so that it fit tightly but comfortably. After all, this is what holds the strapless dress up and prevents a wardrobe malfunction. The foundation is what lines the bodice.
 Rosalina's Dress - Bottom Hem
The underskirt was made of light white satin. I made it 1.5 times as big as the dress’ skirt and gathered it. It is sewn to the bodice along with the dress’ skirt. The bottom hem is overlocked, turned and sewn.
The Petticoat
Because the fabrics I used were so flimsy and I needed a little volume, I made myself a petticoat. It is actually a three tiered skirt made from the off white satin I had originally bought for the underskirt (until I came home and realized it wasn’t white enough for my needs).
 Tiered Petticoat
It is actually quite easy to make. First, measure the length you want your skirt to be (in my case, about a metre). Divide by 3 and add your seam allowance. That is the length of your tiers. Next, cut strips of fabric which are the width of your fabric by the length you measured. Decide how many you will need in advance. In my case, I used one for the first tier, two for the second and four for the third. Sew your rectangles together to make three tubes of varying diameter. Gather the top of the second tube and sew it to the bottom of the first one. Then, gather the top of the third tube and sew it to the bottom of the second one. Hem the bottom. Make a casing atop and insert a drawstring or elastic (I choose elastic for this project because it saved me the trouble of making eyelets, but I might fix that later). There you go: a perfectly easy tiered skirt.
By the way, I don’t think I left one seam not overlocked in this project (I broke three needles just on the petticoat). I did not want any of my seams to come undone or the fabric start fraying after a needed wash. Again, perfectionist. I just wished I had been able to show the Workmanship judge all my hard work, but I was busy trying to catch a toddler so I could barely think of all I had to tell her. Oh well, too late now!
That’s it for the sewing. But wait! Rosalina is not complete without all of her accessories! For all the accessories, I followed Martyn's tutorials, so I won’t go into details on how to make them, but I will show you my results.
The crown
 Rosalina's Crown
All accessories are made of fun foam and spray painted. Compared to other crowns I have made using this material, this is one of the best. I followed Martyn’s measurements (out of sheer laziness), but I find it a little too big compared to the character’s proportions. Also, the bottom finish could have been a little better: I used hot glue to stick a circle of card board at the bottom, but I don’t like how you can see the seam of glue. I probably should have made my circle smaller so it would be hidden inside. Maybe I can still fix that. The bottom of the cardboard is covered with white felt (so I don’t get paint flakes transferred to my hair). A head band bought in a craft store and spray painted silver is inserted through the cardboard so the crown holds on my head.
 Rosalina's Crown - Close-up
The gems are my favourite. Because I did not want to spend 40$ on the perfect cabochons, I bought plastic gems at a craft store and painted them with glitter paint in either red or teal. From afar, they are the right colour, but they are also sparkly.
The earrings
 Rosalina's earrings
The earrings were actually the first thing I made for this project, one sleepless Friday night. They are three layers of fun foam, each one smaller than the previous one. I ended up spray painting them so that all my yellow accessories would be the same. I wanted to glaze them with yellow glitter paint, but I ran out of time. Next time! To make these stars into actual jewellery, I pierced a hole at the top, inserted a large hoop and mounted that on a hook earring. Easy to put on and take off if your toddler decides to try to pull on them too much.
The Brooch
The brooch is made of four layers of fun foam. The first two are full stars, the third has a circle hollowed out (for the “gem”) and the fourth is simply an edge. I used plastic wood (as suggested in Martyn’s tutorial) to make the sides all nice and equal, but it was a little hard to work with because as soon as the foam stretches, the plastic wood cracks. This was spray painted silver.

Rosalina's BroochThe big yellow gem was made using a spherical box containing a laser pointer, which I got in a vending machine. I was actually looking around for the perfect container in the perfect size, but I didn’t care what was inside (good thing too because that stupid laser pointer doesn’t work). I used the clear side, filled the top indentation with plastic wood and spray painted it yellow. I also wanted to glaze that with yellow glitter paint, but again, I ran out of time.
 From Vending Machine Toy to Gem
Once everything was ready, I poured white glue inside the hollowed out circle in the brooch and inserted the gem, holding it tight so the glue would take. I then used hot glue to fix a brooch to the back. Of course, this is one of the first things that got broken during the convention: since my daughter was constantly in my arms, she accidently pulled on the brooch at some point and there are limits to the strength of hot glue. I tried duct tape (never leave home without it!) but it kept falling after half an hour. I borrowed hot glue from the masters in the green room but that didn’t hold. With an hour left before our stage call, I used fresh duct tape and lots of white glue (I has expected something to break – it is bound to happen with a toddler in tow). By the time we stepped on the stage, the brooch was holding, but the glue was not dry. The joys of being a Masquerade participant!
The Wand
 Rosalina's Wand
The wand did not survive the week-end. Not only did I have a hard time making it, it was also destroyed by my daughter.
Originally, I tried using two layers of thick foam (from one of those floor tiles used for kids playrooms). My small craft knife did not do a good job of making the edges nice and smooths, but I figured plastic wood would. How wrong I was. Since it was looking worse every time I worked on it, I decided the night before to use two layers of thin foam for the week-end and to make it better later. On Friday night, I cut my two hollow stars and I spray painted them yellow. As soon as they were dried, I glued them together, sandwiching the small wood dowel I had previously cut and painted silver. I used clothes pins to keep everything in place as it dried overnight.
It looked okay and usable. I stuck in on the stroller so I didn’t have to carry it in my hands all day. In the afternoon, as I was freshening my make-up, my daughter tried to grab it, but she unfortunately pulled at it by holding the foam and she tore it. Out came the white glue to try to fix it before the masquerade. It took forever, but I managed to fix the tear, although it was obvious it had been repaired. On Sunday, while I went back to the convention alone and my daughter stayed at home with her dad, she played with the wand and tore the rest of the star off. So now if I want to wear that costume again, I have a lot of foam fixing to do.
The shoes
 Rosalina's Shoes
I had the perfect shoes for this costume; I’ve had them for years! Pointed, silver, covered in rhinestones and with some teal and gold embroidery.

The perfect shoes I wish I could have wornBut they are heels, and I can’t wear heals anymore (stupid sprain). I had hoped until a week before that my ankle would be fixed in time for me to wear my lovely shoes (I know, wishful thinking), but I had to admit to myself a week before that it was not going to happen. So I got a pair of flat heel, round toe, silver glitter shoes at Wal-Mart. They’re great! But they’re not my perfect shoes. Oh well, at least I have a pair of fancy shoes for Yule now, in case my ankle still isn’t healed by then.
 Gwenyver & Daughter as Rosalina & Toadette, photo by Tanja Dorosh
So there you have it, Rosalina as I made her, in less than 2 weeks I might add! For once, I left no sewing for later - whatever needs fixing is made of foam - and I made it fit me the first time around (no big adjustments needed and requiring my sweetheart’s help), I was comfortable and the sleeves were neither too tight nor too big. Yep! That dress is perfect, and I am happy!