I was ready to start making the buttonholes to lace the back when I had a sudden doubt. Was lacing accurate for an 18th century dress? I know it wasn't exactly common, but I had this vague idea that I had seen one, perhaps in a movie… All I found in my recent research were child’s dresses. So…
I decided to change the closure. I sewed the back close and cut the front open in order too use hook & eye tape as closure. I tried on the dress before I cut and I have just enough give for it to work.
This also means that trim placement will be changing. I want to add more, both on the stomacher and on the skirt.
Sherbet Striped English Dress - Line Drawing
It’s going to look awesome! And yes, it will be done in time, even if I have to forgo sleep!
I worked on my dress over the week-end. Up to now, everything is assembled: the bodice, the sleeves, the dress’ skirt and the skirt.
Sherbet Striped English Dress - Assembled Bodice
Sherbet Striped English Dress - Assembled Bodice & Skirt
Here is a close-up the all the pleating that had to be done to the skirt panel.
Sherbet Striped English Dress - Skirt Construction
For the flounces, I bought some lace from the sale section. Based on the measurements given in Janet Arnold’s Patterns of Fashion 1: Englishwomen's Dresses and their Construction, c. 1660-1860, I cut my pieces, being careful to go around the design. Then, I decides they were too white for my dress fabric, so I aged them by first giving them a tea bath, then rinsing the tea out, followed by a trip to the dryer to fix the colour and finally, a good pressing with a hot iron.
Sherbet Striped English Dress - Flounce before and after Aging
I know it is tough to tell from the picture, but personally, I think the effect is awesome.
So now, all that is left for me to do is do the button holes to lace the dress close in the back, hem everything and add the trim. Oh yeah, and make the tricorne. So yes, I still have a lot of work to do to be ready for the Photo Shoot with Nancy-Raven on Saturday. Let’s hope it is nice and sunny!
I’m not generally a fan of foreign films, but many Chinese and Japanese historical dramas have made it to my DVD collection. The costumes are simply incredible. Recently, I watched Curse of the Golden Flower (2006). It was truly like watching moving art: not only for the costumes, but also the set design and cinematography. It is gorgeous! The story is set during Later Shu of the Five Dynasties and Ten Kingdoms period, in the year 928 C.E. and tells of the turmoil that grows underneath calm the façade presented to the world by the Imperial Family, and of a rebellion…
As with many historical movies, there were many inconsistencies (which Directors like to call Creative Licences, but really, when you have documentation, you don’t need to take creative licences!). First, the metal nail extensions worn by the Empress Phoenix (Li Gong) became popular 600 years after the time the story is set in. Also, the plate armour worn by the men was never popular in China; they preferred scale armour, coat of plates or lamellar armour. The architecture is reminiscent of the Ming Dynasty’s Forbidden City. Finally, I have doubts about the women’s cleavage showing so much, but maybe that is just me.
Now let’s look at a few of these incredible costumes, shall we?
And just to compare, here in a painting from roughly the same time period; it is from the Tang Dynasty, but two centuries before the time when the movie is set.
Beauties Wearing Flowers, by Zhou Fang, 8th century
I guess it’s just like with Western Medieval movies: they always feel the need to make the costumes more pleasant to the modern eye. But still, these costumes are amazing.
Costumes for this movie were designed by Chung Man Yee, which got him an Oscar nomination for Best Achievement in Costume Design.
I got myself a new toy: a ruffler foot for my sewing machine (it also does gathers). You see, when planning my Sherbet Striped English Gown, I decided I wanted a ruffled trim instead of a gathered one. Besides, I’ve been looking for an excuse to get more specialized equipment for sewing and costuming.
Ruffled trim forSherbet Striped English Gown I used 24 mm wide gros grain ribbon in purple and 12 mm gros grain in green. I had to sew them together before ruffling them because, it didn’t stay straight otherwise. The result is a ruffled stripped trim to match the dress fabric.
By the way, if you are interested in getting specialty feet for your sewing machine, I suggest you shop around. Originally, I had gone to a local Singer store (the one situated in Centre Laval), hoping to get the actual Singer part, but I they had the worst customer service I have ever seen. When I entered the store, an oldish (I wouldn’t dare to guess her age – I’m usually not that great at guessing people’s age), overweight woman (I'm being descriptive, not judgemental) was sitting in front of the counter, texting. When she realised I wasn’t leaving, after about 3 seconds, she sighed, straitened up, and ask in an annoyed tone if she could help me. I happily explained I wanted a ruffler foot. “Ruffler? Ruffler! What the heck is that” she barked. She then rose with difficulty, limped to the back of the counter, grabbed a ruffler foot from a display on the wall and threw it on the counter. “Is that it?”. I looked at it for a minute: it wasn’t a Singer brand, and the price was 45.99$ CAD (with Québec taxes, it would have cost me 51.91$ CAD). I guess I stared at it too long, because the lady said “Well are you going to take it?”, to which I answered politely that I was going to keep on shopping because I had seen some for much less. On this she concluded “Huh! Good luck!”.
I got mine for 20.75$ CAD, shipping included. The eBay store I bought it from, Gone Sewing Company, is well organized and I easily found what type would fit on my machine (thanks to good illustrations and exhaustive Model number lists). I received my part within 10 days, which is also quite decent. If you want to buy sewing machine parts of specialty feet, I recommend that seller.
As for the Singer store lady… well I have nothing polite to say, so I’ll leave it at that.
Some people collect sports cards; others collect stamps. I collect sewing pattern, preferably costume ones (amongst many other collections I have). I have over 250! Whenever there is a sale, I can’t help but get a couple more that I don’t yet have. And yes, sometimes I buy some twice by mistake (I should sell my doubles here). My collecting made me buy this Hanbok pattern by Butterick:
Of course at the time, I had no idea what it was supposed to be; I just thought it looked nice. But you know me; I have to know everything about everything (costume related) so I went online and did a little research.
As previously stated, it is a Hanbok. “And just what is a Hanbok?” I hear you say. It is the traditional Korean costume. Just like Kimono in Japanese means garment, Hanbok literally means Korean clothes. The modern Hanbok is based on the fashion of the Joseon Dynasty which ran from 1392 to 1897, but of course, it has evolved in the last century, for practical reasons. Nowadays, the Hanbok is worn as semi-formal or formal wear for traditional festivals and celebrations.
The traditional women’s Hanbok consists of two pieces: the Jeogori which is the short jacket, and the Chima or wrap around skirt.
The Jeogori is made up of Gil, the bodice; Git, a band of fabric that trims the collar; Dongjeong, a removable white collar which is placed over the edge of the Git; Goreum, the ribbon tie that keeps the Jeogori closed at the front; and sleeves, which can have Kkeutdong, different colored cuffs, or not.
Here is a video showing how to properly tie the Goreum:
The Chima is made of a rectangle of cloth which is gathered into a band of fabric (which we’ll call a waistband but really sits atop the bust). The waistband itself extends to be used as ties to securely close the skirt. There are also shoulder straps attached to the waistband that keeps the skirt up and in place.
The traditional men’s Hanbok also consists of the Jeogori, but it is paired with baggy pants called baji, which is also the modern term used for pants. Following the introduction of Western influences at the end of the 19th century, modern men Hanbok also often include a Jokki, which is a vest.
Traditionaly, upper classes Hanbok were woven from ramie or silk, of a variety of colours, although bright colours were usually reserved for children. The colour of the Chima indicated the wearers social status; for instance, navy if she had sons. Only royalty could wear Geumbak or gold leaf printed patterns at the bottom of the Chima.
Commoners were restricted by law to wear cotton (at best), white for everyday clothes and dull shades of pale pink, light green, gray, and charcoal for special occasion.
I’m not sure when or for what occasion I might use my pattern, but it looks like a very comfortable thing to wear!
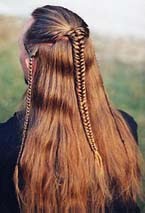
I don't know if I've mentioned this before, but I am clueless when it comes to hairdos - which is kind of ironic since may hair has been long for over two decades. Often when I'm on the Internet, I look for ideas and tutorials. Sometimes what I find is a hairdo for costuming; and then I have to share it with you.
Over at Dreamweaver Braiding, Mary Bertke has tons of examples and tutorials on how to braid hair from the classic three strand to the more complicated eight strand, without forgetting twists and Herringbone. Once you know the basics, you can create complicated assemblages such as Arwen's do in the cut Helm's Deep scene (The Lord of the Rings: The Two Towers - 2002).
Of course, I choose to present only movie hairdos today (as they can be very useful for costuming), but Dreamweaver Braiding has many more examples, many of which are perfect for weddings or RenFaires. Check it out!
On my end, since my hair is not as long as it once was (currently at mid shoulder blades level, but butt length a few years back), I think I'll use Nancy-Raven as a guinea pig!
Did you hear about the Junior high school girl who made her prom dress (well, the corset part of it anyways) out of hundreds if not thousands of Gum Wrappers? And not just any gum: Wriggley 5 – for the colour of its wrappers. Now that is what I call DIY fashion!
Elizabeth Rasmuson of Garner, Iowa, got the idea when she heard hearsay of another DIY fashionista who had made her Prom attire out of Duct Tape. Liz got her friends involded too; she bought the gum, distributed the pieces around and gathered the wrappers. Since such a project requires planning, she started right at the beginning of the school year. And so her date wouldn’t feel out of place (or clash, which would be worse), she made him a matching vest.
The technique for weaving wrappers is fairly easy and it can be applied to other materials such as magazines and chip bags. All you need is to cut pieces measuring 2” by 4 ½”, fold them a certain way and begin weaving.
But back to the Gum wrapper dress, I looked into it and a pack of Wriggley 5 contains 15 pieces and costs 1.26$ CAD before taxes: that means to get 1000 wrappers, it cost her 84$ (CAD), not including dentist fees for cavities and jaw problems developped from chewing all that gum. Not bad for such an original bodice; plus, she made it to Tele!
 Sherbet Striped English Dress - Line Drawing


 Ruffler Presser Foot Feet for Singer Sewing Machine from the Gone Sewing Company


